PHP CRUD Tutorial (part 3)
- PHP CRUD Tutorial (part 1)
- PHP CRUD Tutorial (part 2)
- PHP CRUD Tutorial (part 3)
- Advanced PHP CRUD Tutorial
In this part of tutorial, we are going to create "Read" and "Delete" pages of PHP CRUD grid. This will complete CRUD functions of PHP CRUD grid. Process in this post is actually quite similar to part 2.
Adding "Read" button and "Delete" button
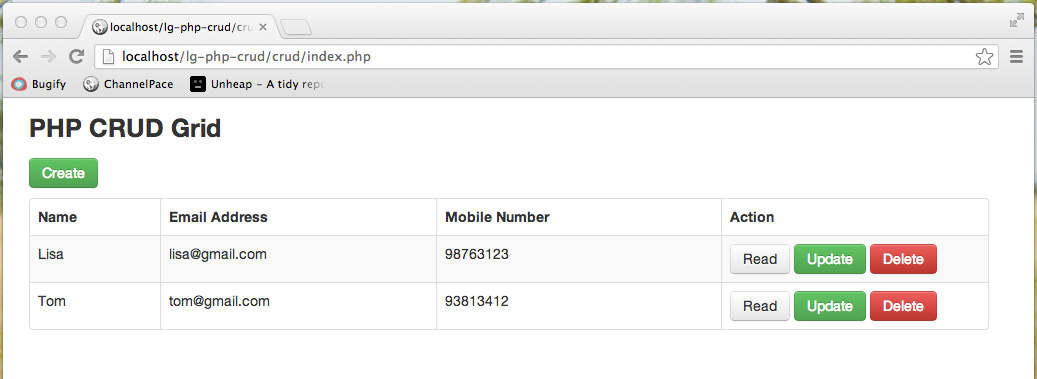
Similar to creating "Create" and "Read" part of PHP CRUD grid. We will firstly need "Update" and "Delete" buttons for each row of the table. Open "index.php" file and add following highlighted codes:
Now the "index.php" file's code should look like below, the highlighted codes are what we have added (or you can just copy all the codes below):
<!DOCTYPE html>
<html lang="en">
<head>
    <meta charset="utf-8">
    <link   href="css/bootstrap.min.css" rel="stylesheet">
    <script src="js/bootstrap.min.js"></script>
</head>

<body>
    <div class="container">
            <div class="row">
                <h3>PHP CRUD Grid</h3>
            </div>
            <div class="row">
                <p>
                    <a href="create.php" class="btn btn-success">Create</a>
                </p>

                <table class="table table-striped table-bordered">
                      <thead>
                        <tr>
                          <th>Name</th>
                          <th>Email Address</th>
                          <th>Mobile Number</th>
                          <th>Action</th>
                        </tr>
                      </thead>
                      <tbody>
                      <?php
                       include 'database.php';
                       $pdo = Database::connect();
                       $sql = 'SELECT * FROM customers ORDER BY id DESC';
                       foreach ($pdo->query($sql) as $row) {
                                echo '<tr>';
                                echo '<td>'. $row['name'] . '</td>';
                                echo '<td>'. $row['email'] . '</td>';
                                echo '<td>'. $row['mobile'] . '</td>';
                                echo '<td width=250>';
                                echo '<a class="btn" href="read.php?id='.$row['id'].'">Read</a>';
                                echo ' ';
                                echo '<a class="btn btn-success" href="update.php?id='.$row['id'].'">Update</a>';
                                echo ' ';
                                echo '<a class="btn btn-danger" href="delete.php?id='.$row['id'].'">Delete</a>';
                                echo '</td>';
                                echo '</tr>';
                       }
                       Database::disconnect();
                      ?>
                      </tbody>
                </table>
        </div>
    </div> <!-- /container -->
  </body>
</html>
Now if you navigate to "index.php page". You should notice "Update" and "Delete" buttons for each row. They are not functional yet. We are going to complete the "Update" page next.

Creating a "Update" page
Create a PHP file "update.php"; this is the "Update" part of CRUD grid. It is almost identically to "Create" part, besides the fact that we will not only update the record, but also show the data.
We will go through this file as two parts like we did for "Create" page.
First part of the codes is an html form. This form part is exactly the same as "Create" page. Copy the code below to "update.php" file:
<!DOCTYPE html>
<html lang="en">
<head>
    <meta charset="utf-8">
    <link   href="css/bootstrap.min.css" rel="stylesheet">
    <script src="js/bootstrap.min.js"></script>
</head>

<body>
    <div class="container">

                <div class="span10 offset1">
                    <div class="row">
                        <h3>Update a Customer</h3>
                    </div>

                    <form class="form-horizontal" action="update.php?id=<?php echo $id?>" method="post">
                      <div class="control-group <?php echo !empty($nameError)?'error':'';?>">
                        <label class="control-label">Name</label>
                        <div class="controls">
                            <input name="name" type="text"  placeholder="Name" value="<?php echo !empty($name)?$name:'';?>">
                            <?php if (!empty($nameError)): ?>
                                <span class="help-inline"><?php echo $nameError;?></span>
                            <?php endif; ?>
                        </div>
                      </div>
                      <div class="control-group <?php echo !empty($emailError)?'error':'';?>">
                        <label class="control-label">Email Address</label>
                        <div class="controls">
                            <input name="email" type="text" placeholder="Email Address" value="<?php echo !empty($email)?$email:'';?>">
                            <?php if (!empty($emailError)): ?>
                                <span class="help-inline"><?php echo $emailError;?></span>
                            <?php endif;?>
                        </div>
                      </div>
                      <div class="control-group <?php echo !empty($mobileError)?'error':'';?>">
                        <label class="control-label">Mobile Number</label>
                        <div class="controls">
                            <input name="mobile" type="text"  placeholder="Mobile Number" value="<?php echo !empty($mobile)?$mobile:'';?>">
                            <?php if (!empty($mobileError)): ?>
                                <span class="help-inline"><?php echo $mobileError;?></span>
                            <?php endif;?>
                        </div>
                      </div>
                      <div class="form-actions">
                          <button type="submit" class="btn btn-success">Update</button>
                          <a class="btn" href="index.php">Back</a>
                        </div>
                    </form>
                </div>

    </div> <!-- /container -->
  </body>
</html>
Second part of the codes is where record update process happens. Copy the codes below to the beginning of "update.php" file; we will go through them afterwards:
<?php
    require 'database.php';

    $id = null;
    if ( !empty($_GET['id'])) {
        $id = $_REQUEST['id'];
    }

    if ( null==$id ) {
        header("Location: index.php");
    }

    if ( !empty($_POST)) {
        // keep track validation errors
        $nameError = null;
        $emailError = null;
        $mobileError = null;

        // keep track post values
        $name = $_POST['name'];
        $email = $_POST['email'];
        $mobile = $_POST['mobile'];

        // validate input
        $valid = true;
        if (empty($name)) {
            $nameError = 'Please enter Name';
            $valid = false;
        }

        if (empty($email)) {
            $emailError = 'Please enter Email Address';
            $valid = false;
        } else if ( !filter_var($email,FILTER_VALIDATE_EMAIL) ) {
            $emailError = 'Please enter a valid Email Address';
            $valid = false;
        }

        if (empty($mobile)) {
            $mobileError = 'Please enter Mobile Number';
            $valid = false;
        }

        // update data
        if ($valid) {
            $pdo = Database::connect();
            $pdo->setAttribute(PDO::ATTR_ERRMODE, PDO::ERRMODE_EXCEPTION);
            $sql = "UPDATE customers  set name = ?, email = ?, mobile =? WHERE id = ?";
            $q = $pdo->prepare($sql);
            $q->execute(array($name,$email,$mobile,$id));
            Database::disconnect();
            header("Location: index.php");
        }
    } else {
        $pdo = Database::connect();
        $pdo->setAttribute(PDO::ATTR_ERRMODE, PDO::ERRMODE_EXCEPTION);
        $sql = "SELECT * FROM customers where id = ?";
        $q = $pdo->prepare($sql);
        $q->execute(array($id));
        $data = $q->fetch(PDO::FETCH_ASSOC);
        $name = $data['name'];
        $email = $data['email'];
        $mobile = $data['mobile'];
        Database::disconnect();
    }
?>
As you see, firstly we check if there is form submit by checking $_POST variable. If so, we check each entries to ensure they pass validation rules, after that it updates database using $_POST data. At last it will redirect to "index.php" using PHP header() function. On the flip side, it is a $_GET request, it will retrieve data record from database.
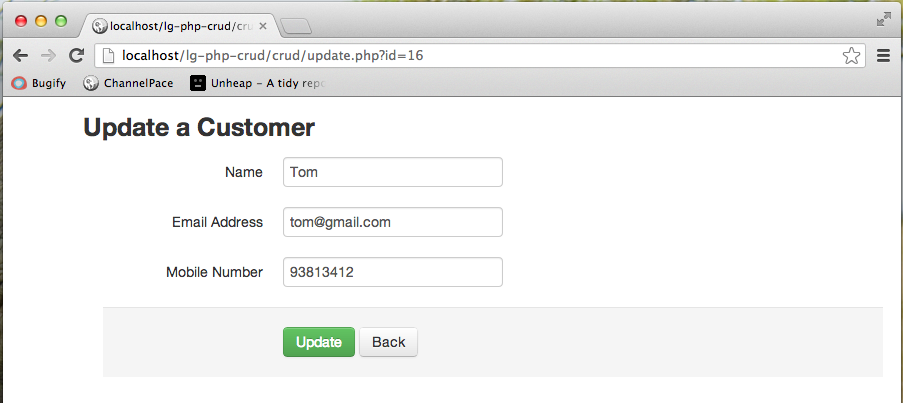
If you have followed correctly. Clicking "Update" button from "index.php" page should lead you to a page similar to below:

Creating a "Delete" page
Here comes the final piece. Create a PHP file "delete.php"; Copy codes below to the file and we will explain afterwards.
<?php
    require 'database.php';
    $id = 0;

    if ( !empty($_GET['id'])) {
        $id = $_REQUEST['id'];
    }

    if ( !empty($_POST)) {
        // keep track post values
        $id = $_POST['id'];

        // delete data
        $pdo = Database::connect();
        $pdo->setAttribute(PDO::ATTR_ERRMODE, PDO::ERRMODE_EXCEPTION);
        $sql = "DELETE FROM customers  WHERE id = ?";
        $q = $pdo->prepare($sql);
        $q->execute(array($id));
        Database::disconnect();
        header("Location: index.php");

    }
?>

<!DOCTYPE html>
<html lang="en">
<head>
    <meta charset="utf-8">
    <link   href="css/bootstrap.min.css" rel="stylesheet">
    <script src="js/bootstrap.min.js"></script>
</head>

<body>
    <div class="container">

                <div class="span10 offset1">
                    <div class="row">
                        <h3>Delete a Customer</h3>
                    </div>

                    <form class="form-horizontal" action="delete.php" method="post">
                      <input type="hidden" name="id" value="<?php echo $id;?>"/>
                      <p class="alert alert-error">Are you sure to delete ?</p>
                      <div class="form-actions">
                          <button type="submit" class="btn btn-danger">Yes</button>
                          <a class="btn" href="index.php">No</a>
                        </div>
                    </form>
                </div>

    </div> <!-- /container -->
  </body>
</html>
Let us look at the beginning part of the PHP codes. It firstly capture the $id from $_GET request. Once a $_GET request is determined. It shows a confirmation page. If a $_POST request is detected, it indicates that user has click confirmation button "Yes". Then it will proceed to delete the data record and redirects to "index.php" page.
Next part, which is the static html part is pretty simple. It simple store the $_GET['id'] to a hidden field.
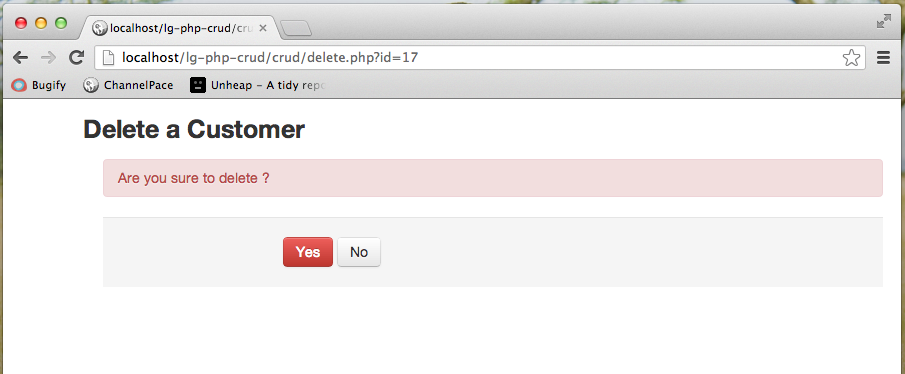
If you get it working. "delete.php" page should look like below. If you click "Yes" button, it should direct to index page and the selected record should be deleted.

Final and Source Code
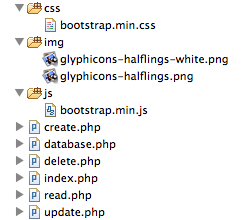
If you have followed along correctly. You should have some files as below:

If you follow along with the tutorials step by step, you will get all the source code in place. However, if you are feeling lazy or have a need to download the complete source code from us. You can do so by paying us a small fee. Your support will enable us to produce better and more in-depth tutorials.
Hopefully, this simple tutorial helped you with your development. If you like our post, please follow us on Twitter and help spread the word. We need your support to continue. If you have questions or find our mistakes in above tutorial, do leave a comment below to let us know.
 Build stunning websites faster with our pre-designed Tailwind CSS templates