Resumable file upload (part 1)
If your application allows users to upload large files. And you are using regular HTML form to post $_FILES. You are doing something wrong. Imagine browser crashes half due to any reason (e.g. Internet is disrupted). How do you handle that? Imagine the user experience while waiting for the $_FILES being posted to server. What can you do to improve that? If you have above questions in mind, this tutorial series is for you. In this series, we will use a wonderful JavaScript library Resumable.js to build a resumable file upload application. This library is designed to introduce fault-tolerance into the upload of large files through HTTP. This is done by splitting each files into small chunks; whenever the upload of a chunk fails, uploading is retried until the procedure completes.
In part 1 of the series, we will go through the steps to implement front-end of the application. Which is building the front-end Resumable.js uploader. And in part 2, we will work on the backend system.
Download link of entire source code is provided in the finale part this series.
Install Bower
Bower is an awesome package management tool, It works by fetching and installing packages from all over, taking care of hunting, finding, downloading, and saving the stuff you’re looking for In this tutorial, we will use Bower to handle assets management (JavaScript and CSS files).
So first thing we need to do is to get Bower installed in our development machine. If you are using Mac OS, simply type following command in the Terminal
npm install -g bower
Since Bower requires on Node, NPM and Git. In case it does not work above, make sure those are also installed.
Do not be discouraged if your installation does not go through as easy as expected. We highly recommend that you use Bower in your development workflow, it costs your a bit of time to get it installed, it improves productivity a lot more later on.
For detailed installation of Bower, you can refer to its official site.
Install Twitter Bootstrap and Resumable.js
Awesome! You have Bower installed, let's see how easy to install Twitter Bootstrap and Resumable.js by using Bower.
Simply type following commands in your terminal from the root of your project fold
bower install bootstrap
bower install resumablejsv
Instead of downloading zip files from those packages' website, extract their source files to the desired location, figure out their dependencies and repeat the same routine to install their dependencies. Bower has done all the work for us.
Check out your project root folder, you should see something similar:

Bower has downloaded all the assets files we need as well its dependency files to the folder bower_components.
Build Resumable.js Uploader
We have done all the preparation work, it is time to build the front-end uploader. The reason we call it front-end is because it has the only interface. It does not really work without the backend file handling.
To simulate backend response, we create a PHP file(upload.php) with content below:
<?php
 return header("HTTP/1.0 200 Ok");
?>
This script simulates a forever-green upload. Basically it always tells Resumable.js that the file chunk is uploaded successfully. In part 2 of the series, we will get back to make it really work.
Now let's work on the uploader.
Create a file index.html and copy the content below, we will explain it in detail later on.
<!DOCTYPE html>
<html>
<head lang="en">
    <meta charset="UTF-8">
    <title>Resumable File Upload</title>
    <link href="bower_components/bootstrap/dist/css/bootstrap.min.css" rel="stylesheet">

    <script src="bower_components/resumablejs/resumable.js" type="application/javascript"></script>
    <script src="bower_components/jquery/dist/jquery.min.js" type="application/javascript"></script>
    <script src="bower_components/bootstrap/dist/js/bootstrap.min.js" type="application/javascript"></script>
</head>
<body>

<div class="container" style="padding-top: 100px;">

    <div class="row">
        <div class="col-lg-offset-2 col-lg-8">
            <div class="page-header">
                <h1> Resumable file upload<small> <br/>with Resumable.js and Resumable.php</small></h1>
            </div>
        </div>

        <div class="col-lg-offset-2 col-lg-8">
            <button type="button" class="btn btn-success" aria-label="Add file" id="add-file-btn">
                <span class="glyphicon glyphicon-plus" aria-hidden="true"></span> Add file
            </button>
            <button type="button" class="btn btn-info" aria-label="Start upload" id="start-upload-btn">
                <span class="glyphicon glyphicon-upload" aria-hidden="true"></span> Start upload
            </button>
            <button type="button" class="btn btn-warning" aria-label="Pause upload" id="pause-upload-btn">
                <span class="glyphicon glyphicon-pause " aria-hidden="true"></span> Pause upload
            </button>
        </div>


        <div class="col-lg-offset-2 col-lg-8">
            <p>
                <div class="progress hide" id="upload-progress">
                    <div class="progress-bar progress-bar-success progress-bar-striped" role="progressbar"   style="width: 0%">
                        <span class="sr-only"></span>
                    </div>
                </div>
            </p>
        </div>
    </div>

</div>


<script>
    var r = new Resumable({
        target: 'upload.php',
        testChunks: true
    });

    r.assignBrowse(document.getElementById('add-file-btn'));

    $('#start-upload-btn').click(function(){
        r.upload();
    });

    $('#pause-upload-btn').click(function(){
        if (r.files.length>0) {
            if (r.isUploading()) {
              return  r.pause();
            }
            return r.upload();
        }
    });

    var progressBar = new ProgressBar($('#upload-progress'));

    r.on('fileAdded', function(file, event){
        progressBar.fileAdded();
    });

    r.on('fileSuccess', function(file, message){
        progressBar.finish();
    });

    r.on('progress', function(){
        progressBar.uploading(r.progress()*100);
        $('#pause-upload-btn').find('.glyphicon').removeClass('glyphicon-play').addClass('glyphicon-pause');
    });

    r.on('pause', function(){
        $('#pause-upload-btn').find('.glyphicon').removeClass('glyphicon-pause').addClass('glyphicon-play');
    });

    function ProgressBar(ele) {
        this.thisEle = $(ele);

        this.fileAdded = function() {
            (this.thisEle).removeClass('hide').find('.progress-bar').css('width','0%');
        },

        this.uploading = function(progress) {
            (this.thisEle).find('.progress-bar').attr('style', "width:"+progress+'%');
        },

        this.finish = function() {
            (this.thisEle).addClass('hide').find('.progress-bar').css('width','0%');
        }
    }
</script>

</body>
</html>
- In head part, we include Twitter Bootstrap and Resumable.js asset files and their dependencies.
- In ...part, we create a simple and neat uploader interface using Twitter Bootstrap framework.
- part is where we create Resumable uploader. Let's look into this part in details.
- Line 51-54: instantiate a Resumable instance, specify target to point to upload.php file.
- Line 56: make #add-file-btn as the browser file button.
- Line 58-60: when clicking #add-file-btn button, file upload starts.
- Line 58-60: when clicking #pause-upload-btn button, toggle file upload progress.
- Line 71: instantiate a ProgressBar instance. ProgressBar is a simple class we create to encapsulate the progress bar.
- Line 73-88: listen to Resumable.js various events and manipulate progress bar's status accordingly.
- Line 90-104: ProgressBar class definition. As mentioned early, it provides an easy way to change progress bar's status.
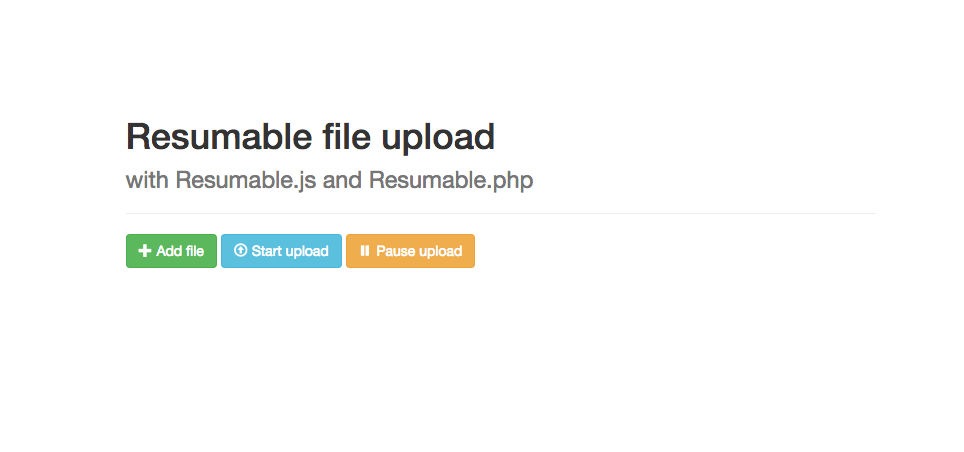
We have built a Resumble.js uploader, if you have followed along correctly, you should be able to see a uploader similar to below when accessing the index.html page:
The end
Now we have completed the first tutorial. Next tutorial, we are going to build backend part of the uploader. Make sure to sign up our newsletter, so that we can update you once next tutorial is out.
Hopefully this simple tutorial helped you with your development. If you like our post, please follow us on Twitter and help spread the word. We need your support to continue. If you have questions or find our mistakes in above tutorial, do leave a comment below to let us know.